If you’ve ever wondered why some pictures just seem to have that extra oomph, you’re in for a treat. Today, we’re diving into a nifty little trick that photographers and artists swear by – the Rule of Thirds. This isn’t some complex mathematical formula, It’s a simple yet effective technique that can instantly transform your images from good to jaw-dropping. Let’s break it down.
What’s the Buzz About the Rule of Thirds?
Picture this: you’re out in the great outdoors, camera in hand, ready to capture that stunning sunset. You want your photo to be the envy of Instagram, but there’s just one problem – your shots always seem a tad… meh. That’s where the Rule of Thirds sweeps in like a superhero with a cape. It’s like having a magical grid that guides you on where to place your main subject. No more guesswork or hoping for the best!

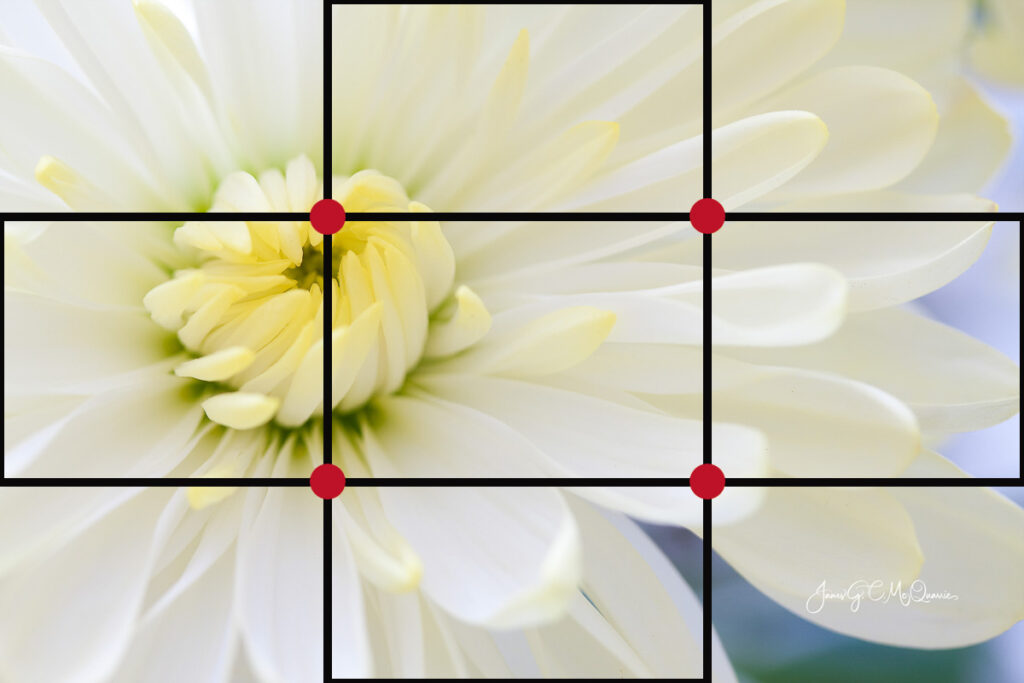
The image on the left shows a very simple use of the Rule of Thirds, with the intersection of the top line and the left line being placed very close to the center of the flower. This draws the eye to the center of the flower.
The 9-Block Marvel
Imagine your camera’s viewfinder has a tic-tac-toe grid on it. Got that image in your head? Great! Now, you’ve got nine equally-sized squares to play with – three rows and three columns. This magical grid gives you four intersecting points, and guess what? Those points are like magnets for the eyes of anyone who lays eyes on your photo. Trust me, it’s like having a hidden treasure map leading to the good stuff in your image.
Why is the Rule of Thirds So Darn Effective?
Here’s the deal: our brains have a thing for balance and harmony. Plonking your subject smack-dab in the center of your shot might seem like the obvious thing to do, but it can be a tad… boring. The Rule of Thirds zaps your photo with a dose of dynamic energy. By placing your subject along those alluring intersection points or along the lines themselves, you’re giving your photo a sense of movement and intrigue.
Nature’s Playground
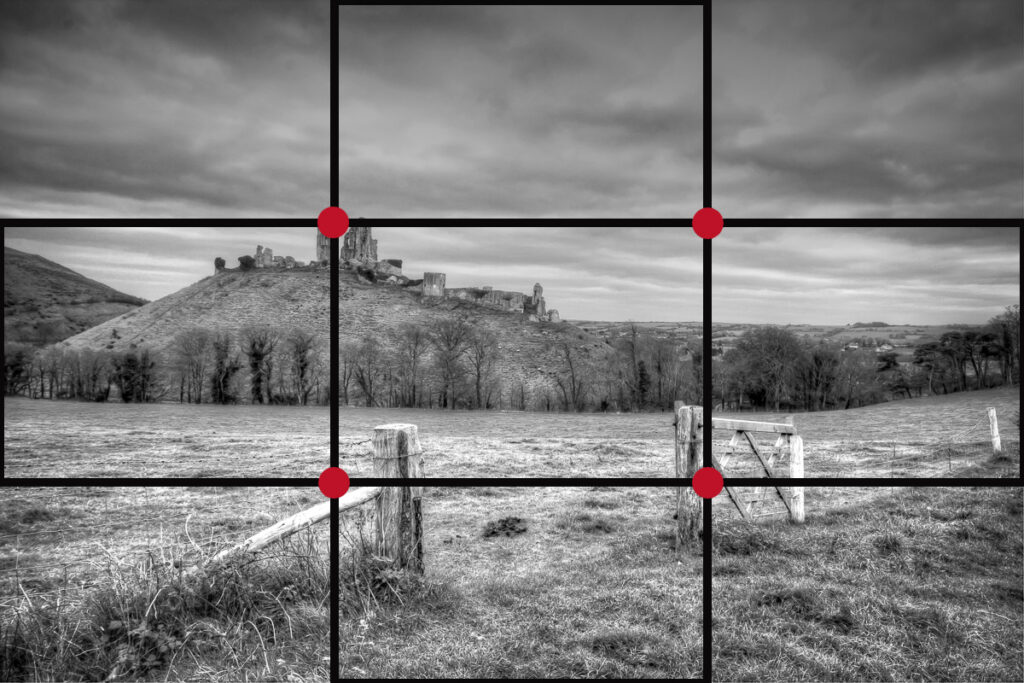
This rule isn’t just for fancy-pants portrait shots – it works wonders for landscapes too. Imagine you’re capturing the grandeur of a mountain range. Instead of plonking those peaks right in the middle, you’d want to align them along one of those gridlines. Boom! Instant depth and a dash of drama. Your shot goes from “Oh, that’s nice” to “Whoa, I need to frame that!”
Another example of the Rule of Thirds. The top and left lines intersect right over Corfe Castle.

A Glimpse into Symmetry and Asymmetry
Now, don’t get me wrong – symmetry is great when you’re playing with reflections or architecture. But for a twist, try a little asymmetry. Plonk your subject off-center and watch as your photo comes alive with a splash of tension. It’s like a secret ingredient that adds an extra layer of zest to your visual dish.
The Eyes Have It
Ever taken a portrait and felt like something was… off? It’s possible you didn’t consider your subject’s eyes. The Rule of Thirds gives those peepers the royal treatment they deserve. When you’re taking portraits, try placing your subject’s eyes along one of those sweet intersection points. Voilà! Instant connection between your subject and the viewer. It’s like a visual conversation that draws you right into the image.
Photography is all About Choices
At the end of the day, photography is about making choices – where to stand, when to click, and how to compose. The Rule of Thirds is like your trusty sidekick, guiding you toward making choices that result in visually captivating images. It’s not a hard-and-fast rule, mind you. Sometimes, breaking it can lead to some mind-blowing shots too. But knowing it, understanding it, and then deciding when to bend it can take your photography game to new heights.
Time to Give it a Whirl!
So there you have it. The Rule of Thirds – your secret weapon for creating images that have that extra sprinkle of magic. Remember, it’s not about robotic perfection; it’s about having a blast and adding that extra spark to your shots. So, next time you’re framing that perfect shot, let those intersection points be your guiding stars. Happy snapping!
Check out my Blog post on Depth of Field.


Pingback: 10 Steps to shooting perfect panorama images | 2nd Square Photography
Pingback: Great Still Life Photos in 8 steps. | 2nd Square Photography
Pingback: Learning Photography composition
Pingback: Exploring Black and White Photography: How to Create Striking Monochrome Images | 2nd Square Photography